How to Fix Jacket Zippers in 2025: A Step-by-Step Guide
Jacket zippers fail at the worst times. Sometimes a stuck slider or a row of misaligned teeth can make your favorite jacket useless. But get this. Over 70 percent of jacket zippers can be fixed at home without any sewing experience or fancy tools. Most people just toss their jackets or pay for costly repairs, totally missing how simple it is to get that smooth zip working again.
Table of Contents
- Step 1: Assess Your Current Zipper Situation
- Step 2: Gather Required Tools and Materials
- Step 3: Repair or Replace the Zipper Slider
- Step 4: Align and Reattach the Zipper Tape
- Step 5: Test the Zipper Functionality
- Step 6: Finalize and Maintain Your Jacket Zipper
Quick Summary
| Key Point | Explanation |
|---|---|
| 1. Assess the zipper condition first | Examine the zipper for misalignment, damage, and functionality before deciding on repair methods. |
| 2. Prepare the right tools and materials | Assemble tools such as pliers, scissors, and matching thread to facilitate a smooth repair process. |
| 3. Carefully realign or replace the slider | Align the slider or replace it if damaged, ensuring it moves smoothly over the zipper teeth. |
| 4. Maintain the zipper with regular care | Clean and lubricate the zipper regularly to prevent future issues and extend its lifespan. |
| 5. Conduct thorough functionality testing | Test the repaired zipper under normal wear conditions to ensure it operates smoothly and securely. |
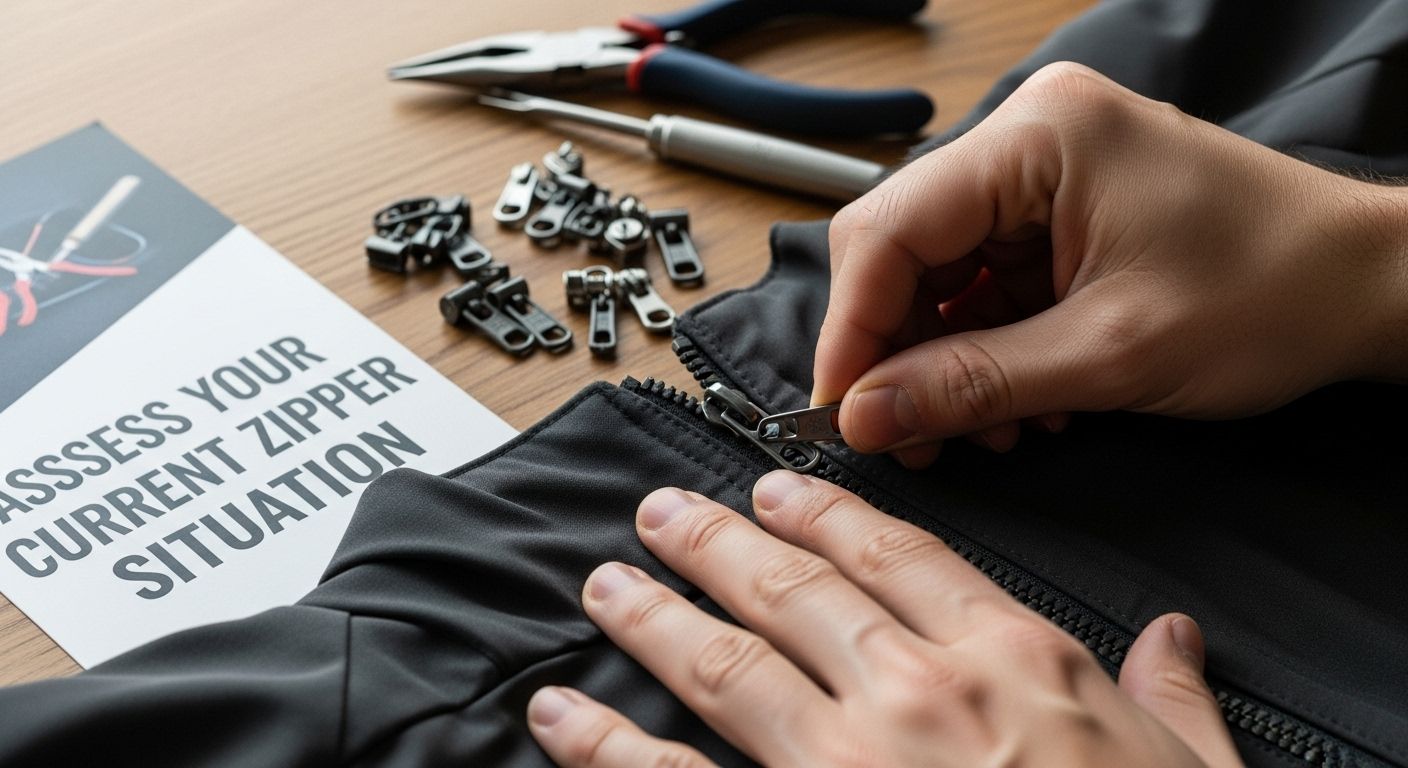
Step 1: Assess Your Current Zipper Situation
Before diving into repairs, understanding the specific condition of your jacket zipper is crucial for selecting the right approach. Zipper diagnostics start with a careful and systematic examination that will determine whether you need a simple adjustment or a more comprehensive repair.
Begin by laying your jacket on a flat surface with good lighting. Gently pull the zipper up and down, paying close attention to its movement and behavior. Look for telltale signs of damage such as misaligned teeth, fabric caught in the mechanism, or a slider that seems loose or difficult to maneuver. Texas A&M University experts recommend a thorough visual and tactile inspection to diagnose zipper issues accurately.
Carefully examine the zipper teeth for any signs of damage like missing, bent, or broken teeth. These structural problems can significantly impact the zipper’s functionality. Check where the fabric connects to the zipper, looking for loose threads or areas where the zipper might be pulling away from the jacket material. Some common issues you might encounter include:
- Teeth that no longer interlock smoothly
- Slider moving unevenly or getting stuck
- Visible wear or distortion in the zipper mechanism
- Fabric consistently catching in the zipper track
Next, test the zipper’s tension by gently pulling it up and down. A well-functioning zipper should move smoothly without requiring excessive force. If you notice significant resistance or hear unusual sounds like grinding or scraping, this indicates internal problems that will require specific repair techniques.
Pay special attention to the slider itself. This small component is often the primary culprit in zipper malfunctions. Look for signs of wear such as visible gaps, misalignment, or a slider that seems loose or doesn’t close teeth completely. These observations will guide your subsequent repair strategy, helping you determine whether you need to replace the slider, realign the teeth, or address more complex structural issues.
Below is a troubleshooting table that organizes the common jacket zipper issues described in the guide, their possible causes, and recommended solutions for effective repair.
| Problem | Possible Cause | Solution |
|---|---|---|
| Teeth not interlocking | Misaligned or bent teeth | Gently realign teeth with pliers |
| Slider stuck or uneven | Dirt/debris in teeth; slider misalignment | Clean teeth; realign slider |
| Slider does not close teeth | Worn or damaged slider | Replace slider with exact match |
| Zipper fabric pulls away | Loose threads or weak seam | Reinforce with needle and thread |
| Fabric catches in zipper | Misalignment or frayed edges | Trim edges; realign zipper tape |
| Zipper hard to move | Lack of lubrication or internal damage | Clean and lubricate zipper track |
| Stops detaching or missing | Loose or broken top/bottom stops | Reinforce or reattach stops |
Step 2: Gather Required Tools and Materials
Preparing the right tools before starting your zipper repair can make the difference between a quick fix and a frustrating experience. Proper preparation ensures you have everything needed to address your jacket zipper issue efficiently and effectively.
The American Hiking Society recommends assembling a comprehensive repair kit, which becomes especially crucial when dealing with jacket zippers. Your repair toolkit should include precision tools that allow for careful manipulation of delicate zipper components.
Start by collecting essential tools like needle-nose pliers with a fine tip, which provide excellent grip and precision when working with small zipper mechanisms. A small pair of sharp scissors will help you trim any loose threads or damaged fabric around the zipper. Grab a good quality sewing needle and thread that matches your jacket’s color – this will be crucial for any necessary stitching or reinforcement.
For slider repairs or replacements, you’ll want to have a selection of replacement zipper sliders on hand. These can often be purchased in multipacks and come in various sizes and styles. Pro tip: Keep a few different sizes and finishes to ensure you have the right match for different jackets.
Additional materials that will prove invaluable include:
- Fabric tweezers for precise adjustments
- Rubbing alcohol and cotton swabs for cleaning zipper teeth
- Soft-bristled toothbrush for gentle cleaning
- Fabric glue or seam sealant for reinforcing fabric edges
Consider having a small magnifying glass nearby to inspect intricate zipper details. Lubricants like beeswax or specialized zipper lubricant can help smooth out stubborn mechanisms. Wear comfortable, well-lit workspace clothing that allows you to move freely and see detailed work.
Before beginning repairs, organize your tools on a clean, flat surface. Ensure good lighting and have a clear workspace. Verify that you have all materials within easy reach, minimizing interruptions during the repair process. Your preparedness will directly impact the success and efficiency of your jacket zipper restoration.
To help you prepare for any jacket zipper repair, here is a table summarizing the essential tools and materials described in the guide, along with their specific purposes.
| Tool/Material | Purpose |
|---|---|
| Needle-nose pliers | Gripping and adjusting zipper components |
| Small sharp scissors | Trimming loose threads or fabric |
| Sewing needle and thread | Reattaching or reinforcing zipper tape |
| Replacement zipper sliders | Substituting damaged or worn-out sliders |
| Fabric tweezers | Making precise adjustments to zipper parts |
| Rubbing alcohol & cotton swabs | Cleaning zipper teeth and slider |
| Soft-bristled toothbrush | Gently cleaning teeth and slider |
| Fabric glue or seam sealant | Reinforcing fabric edges near the zipper |
| Magnifying glass | Inspecting intricate zipper details |
| Beeswax or zipper lubricant | Smoothing the slider movement along the teeth |
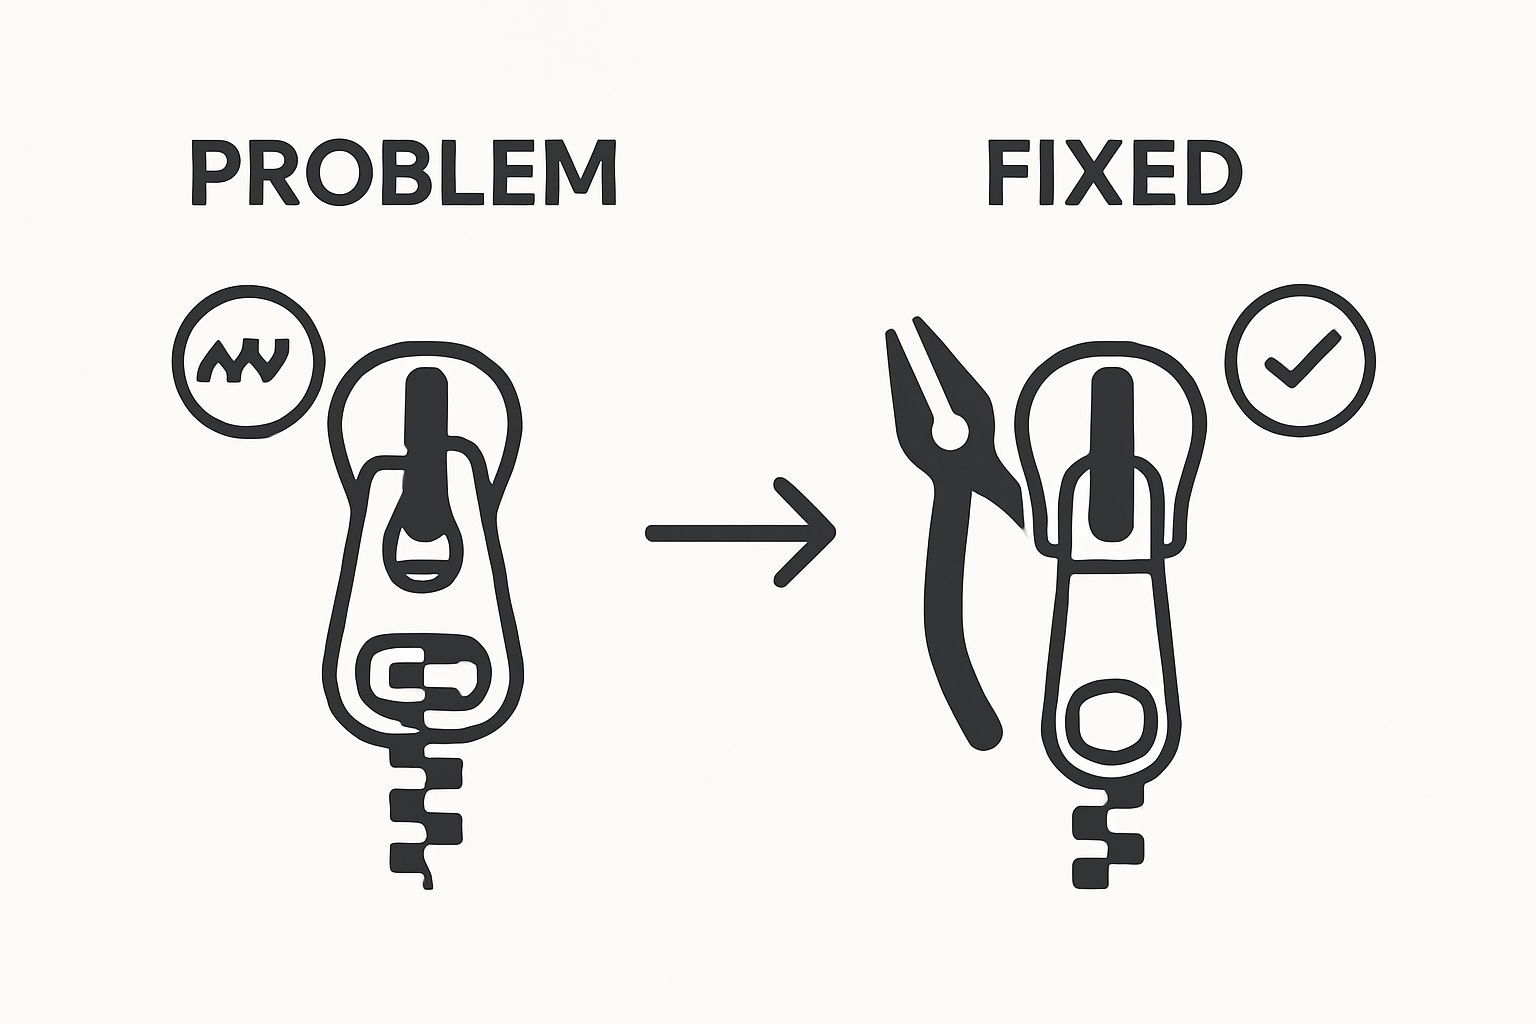
Step 3: Repair or Replace the Zipper Slider
The zipper slider is the heart of your jacket’s closure mechanism, and when it fails, your entire jacket’s functionality can be compromised. Precision and patience are key when addressing slider issues, whether you’re repairing or completely replacing this critical component.
The Mountaineers recommend carefully matching replacement sliders to your existing zipper size and style. Begin by examining the current slider closely. If the slider is simply misaligned or slightly damaged, you might be able to reshape it using needle-nose pliers. Gently squeeze the sides of the slider to realign its internal tracks, ensuring they grip the zipper teeth uniformly.
For more severe slider damage, replacement becomes necessary. Start by carefully removing the old slider. Use your needle-nose pliers to gently pry open the bottom stop of the zipper, which will allow you to slide the old slider off completely. Take a moment to clean the zipper teeth using a soft-bristled toothbrush and rubbing alcohol, removing any dirt or debris that might impede smooth movement.
When selecting a new slider, pay close attention to the zipper’s width and tooth configuration. Sliders are not universal – they must precisely match your jacket’s specific zipper type. Pro tip: If possible, bring the old slider with you when purchasing a replacement to ensure an exact match.
Installation requires a delicate touch. Align the new slider carefully, ensuring it moves smoothly over the zipper teeth without catching or binding. You’ll want to:
- Position the slider at the bottom of the zipper track
- Ensure teeth are completely aligned before sliding
- Gently work the slider up and down to test smooth movement
- Reattach the bottom stop using pliers if necessary
If you encounter resistance during installation, do not force the slider. This could potentially damage the zipper further. Instead, double-check alignment and try again with gentle, consistent pressure. A well-installed slider should move smoothly up and down the zipper track with minimal effort, creating a secure and reliable closure for your jacket.
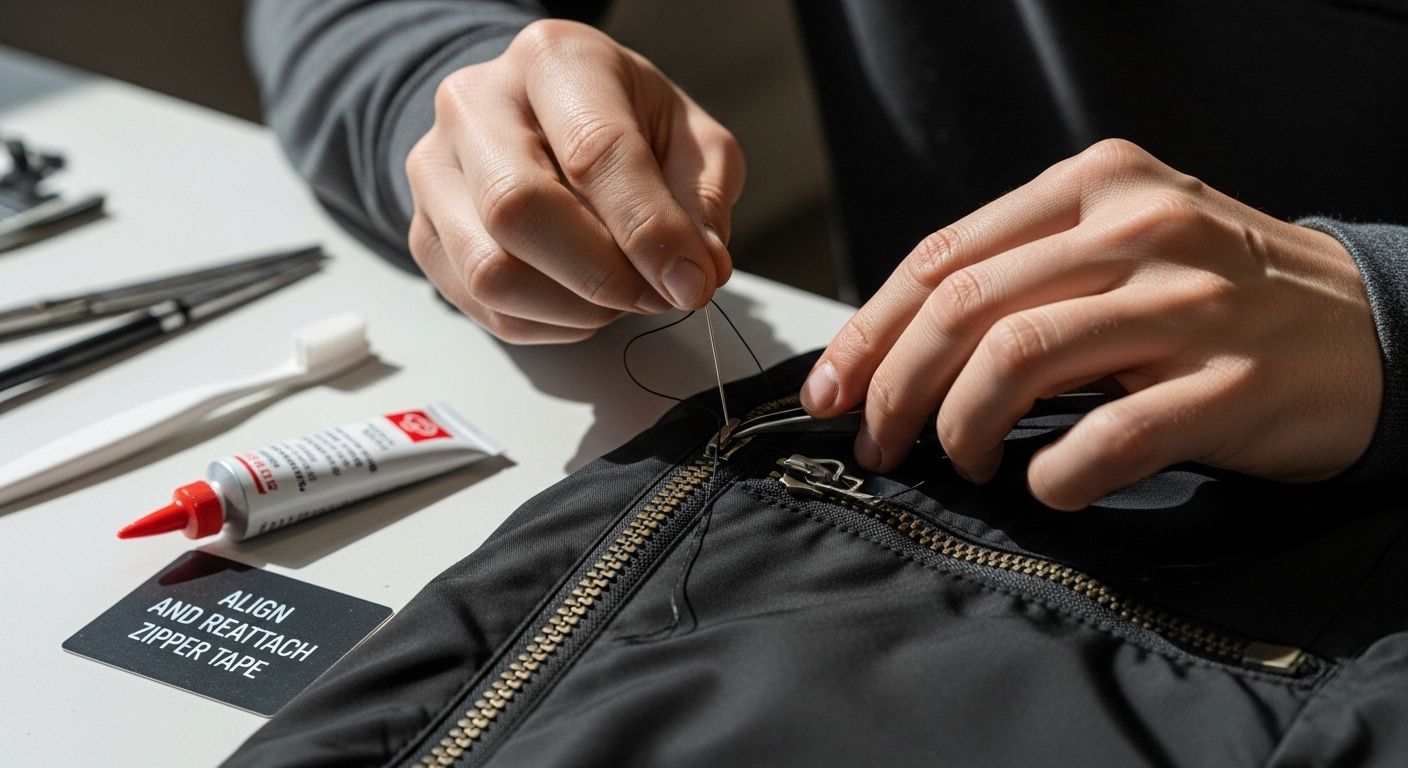
Step 4: Align and Reattach the Zipper Tape
Aligning and reattaching zipper tape requires precision and patience, transforming a potentially damaged zipper into a functional closure. Careful manipulation of the zipper’s delicate components will determine the success of your repair.
The American Hiking Society recommends a methodical approach to zipper realignment. Begin by spreading the jacket on a flat, well-lit surface that allows you to examine the zipper tape thoroughly. Look for any misalignment, loose threads, or areas where the fabric has pulled away from the zipper track.
Carefully inspect the zipper teeth, ensuring they are straight and free from bends or distortions. Use needle-nose pliers to gently straighten any teeth that have been bent or pushed out of alignment. Work slowly and deliberately, applying minimal pressure to avoid breaking the delicate teeth. Sometimes, a misaligned tooth can be carefully nudged back into its original position using the tip of the pliers.
Next, focus on the fabric attachment points. If the zipper tape has started to pull away from the jacket material, you’ll need to reinforce these connections. Thread a needle with a color-matched thread that blends seamlessly with your jacket’s fabric. Use small, tight stitches to reattach the zipper tape, working carefully to maintain the original line of the jacket’s seam.
Pay special attention to the bottom and top stops of the zipper. These critical points anchor the entire zipper mechanism and prevent the slider from completely detaching. Secure these areas with additional reinforcement stitches, ensuring they are tight and even. Key areas to focus on include:
- Bottom zipper stop
- Top zipper stop
- Points where zipper tape meets jacket fabric
- Areas with visible thread wear or separation
Once you’ve completed the realignment and reattachment, test the zipper’s functionality. Slowly zip and unzip the jacket several times, watching for smooth movement and proper teeth interlocking. Listen for any unusual sounds and feel for any resistance. A successfully repaired zipper should move effortlessly, with teeth engaging smoothly and the slider gliding without catching or jamming. If you encounter any persistent issues, you may need to repeat the alignment process or consider professional repair for more complex zipper damage.
Step 5: Test the Zipper Functionality
The ultimate validation of your zipper repair is a comprehensive functionality test that ensures your hard work has restored the jacket’s closure mechanism to its optimal performance. Thorough testing will reveal whether your repair has successfully addressed the initial zipper issues.
The East African Standard recommends a systematic approach to zipper testing that goes beyond a simple up and down motion. Begin by putting on the jacket and performing a series of deliberate movements that will simulate real-world stress on the zipper mechanism.
Start with a gentle, controlled zip-up from bottom to top. Pay close attention to how the slider moves across the teeth. A properly repaired zipper should glide smoothly without catching, binding, or requiring excessive force. Listen carefully for any unusual sounds like grinding or scraping, which might indicate lingering alignment issues. The zipper should create a clean, uniform closure with teeth interlocking precisely and evenly.
Next, perform a series of dynamic tests that challenge the zipper’s functionality. Move your arms, twist your torso, and simulate various active movements you might typically do while wearing the jacket. These motions will help you identify any potential weaknesses in your repair. Watch for signs of stress such as the slider separating, teeth pulling apart, or the zipper suddenly becoming difficult to manipulate.
Critical testing criteria include:
- Smooth upward and downward movement
- Complete and secure closure
- No fabric catching in the zipper mechanism
- Consistent tension throughout the entire zip
- No visible gaps or misalignments
If you encounter any issues during testing, do not become discouraged. Minor problems can often be resolved with additional fine-tuning. Return to your previous repair steps, focusing on realigning teeth, adjusting the slider, or reinforcing attachment points. Sometimes, a second careful adjustment can resolve lingering functionality concerns.
Remember that a successful zipper repair is not just about immediate functionality, but about creating a durable solution that will withstand repeated use. Take your time during testing, and be willing to make incremental adjustments until you achieve a smooth, reliable zipper that meets your jacket’s original performance standards.
Step 6: Finalize and Maintain Your Jacket Zipper
Successful zipper repair is only the beginning of ensuring your jacket’s long-term functionality. Ongoing maintenance will protect your investment and prevent future zipper issues from developing. The Mountaineers emphasize the critical nature of consistent care and preventative practices.
Start by thoroughly cleaning the zipper after your repair. Use a soft-bristled toothbrush to gently remove any accumulated dirt or debris from the teeth and slider. For leather jackets, consider using a specialized leather cleaner that won’t damage the fabric while ensuring the zipper remains free from contaminants that could cause future wear.
Regular lubrication can significantly extend your zipper’s life, but approach this step with caution. Avoid heavy oils or generic lubricants that might attract dirt. Instead, use a specialized zipper wax or graphite-based lubricant applied sparingly. Run the lubricant along the teeth, ensuring smooth movement without excess buildup. This small step can prevent future catching and reduce overall mechanical stress on the zipper mechanism.
Develop a habit of careful zipper usage. Mindful zipping means avoiding forceful movements and taking a moment to align the teeth before pulling the slider. When putting on or removing your jacket, support the fabric near the zipper to reduce strain. If you notice any resistance, stop and investigate rather than applying additional force that could cause damage.
Key maintenance practices include:
- Cleaning zipper after exposure to dirt or salt
- Checking alignment before each use
- Storing jacket with zipper partially closed
- Avoiding extreme temperature variations
- Periodic professional inspection for complex jackets
Consider exploring our specialized motorcycle jacket collection for additional insights into high-performance jacket maintenance. By investing a few minutes in regular care, you’ll extend your jacket’s lifespan and maintain its professional appearance. Remember that preventative maintenance is always more cost-effective than complete zipper replacement, making these simple steps a worthwhile investment in your favorite jacket’s longevity.
Ready for a Reliable Zipper Solution? Discover Premium Jackets Built to Last
After following every careful zipper repair step, you might wonder if your current jacket is truly built for repeated fixes. Frustrated by stuck sliders, broken teeth, and constant adjustments? Your jacket should make you feel confident and comfortable, not stressed about when the zipper will jam again. Even with perfect maintenance, some jackets just cannot keep up with your lifestyle. If you are looking for jackets designed for durability, style, and modern zipper engineering, let us help you upgrade.
Explore the latest quality jackets in our Maker of Jacket’s collection and browse customizable options tailored for real world use. Experience smoother zippers, reinforced seams, and customizable details you cannot find in off-the-rack choices.

Why settle for last year’s struggles? Shop at our main store to choose a jacket that matches your style and performance needs. Discover the benefits of free worldwide shipping, proven customer satisfaction, and an extensive gallery for inspiration. Say goodbye to zipper problems and start your next adventure in comfort and confidence when you order your new favorite jacket today.
Frequently Asked Questions
How can I assess the condition of my jacket zipper before attempting repairs?
Begin by laying your jacket flat and testing the zipper’s movement. Look for misaligned teeth, stuck sliders, or any signs of damage such as bent teeth or fabric caught in the mechanism. A systematic inspection can help determine if you need a simple adjustment or a more comprehensive repair.
What tools do I need to fix a jacket zipper?
You will need precision tools, including needle-nose pliers, a small pair of scissors, a sewing needle and thread, replacement zipper sliders, fabric tweezers, rubbing alcohol, and possibly a lubricant like beeswax for smoother operation.
How do I know if I need to replace the zipper slider?
If the slider is misaligned or damaged but repairable, you can reshape it. However, if it’s severely damaged and won’t grip the teeth properly, replacing the slider is necessary. Ensure the replacement matches the size and style of your existing zipper.
What are the key steps in maintaining my jacket zipper after repair?
Regular maintenance includes cleaning the zipper with a soft brush, applying a specialized zipper lubricant, checking for alignment, and avoiding forceful zipping. It’s also good practice to store your jacket with the zipper partially closed to prevent strain.
