

Motorcycle apparel layering guide for comfort & safety 2026

Riding a motorcycle exposes you to temperature swings, wind chill, and unpredictable weather that can turn a comfortable trip into a miserable ordeal. Without the right layering strategy, you risk overheating on sunny stretches or suffering dangerous cold on shaded highways. This guide explains a proven three-layer system that keeps you comfortable and protected year-round, adapting seamlessly to shifting conditions so you can focus on the ride.
Table of Contents
- Understanding The Three-Layer System For Motorcycle Apparel
- Choosing High-Performance Materials For Safety And Durability
- Practical Tips To Prevent Hypothermia And Manage Thermal Regulation
- Step-By-Step Layering Method For Common Riding Weather Scenarios
- Explore Custom Motorcycle Jackets Designed For Layering And Protection
Key takeaways
| Point | Details |
|---|---|
| Three-layer system | Base, mid, and outer layers work together to regulate temperature and protect against wind, rain, and impact. |
| Material selection | Abrasion-resistant fabrics and impact-rated armor in key zones reduce injury risk during falls. |
| Head and neck coverage | Dense blood vessels in these areas radiate heat rapidly, making insulation critical in cold conditions. |
| Scenario-based adjustments | Add or remove layers based on season and weather to maintain comfort without compromising safety. |
| Custom fit advantages | Tailored jackets optimize layering space and protective features for individual body types and riding styles. |
Understanding the three-layer system for motorcycle apparel
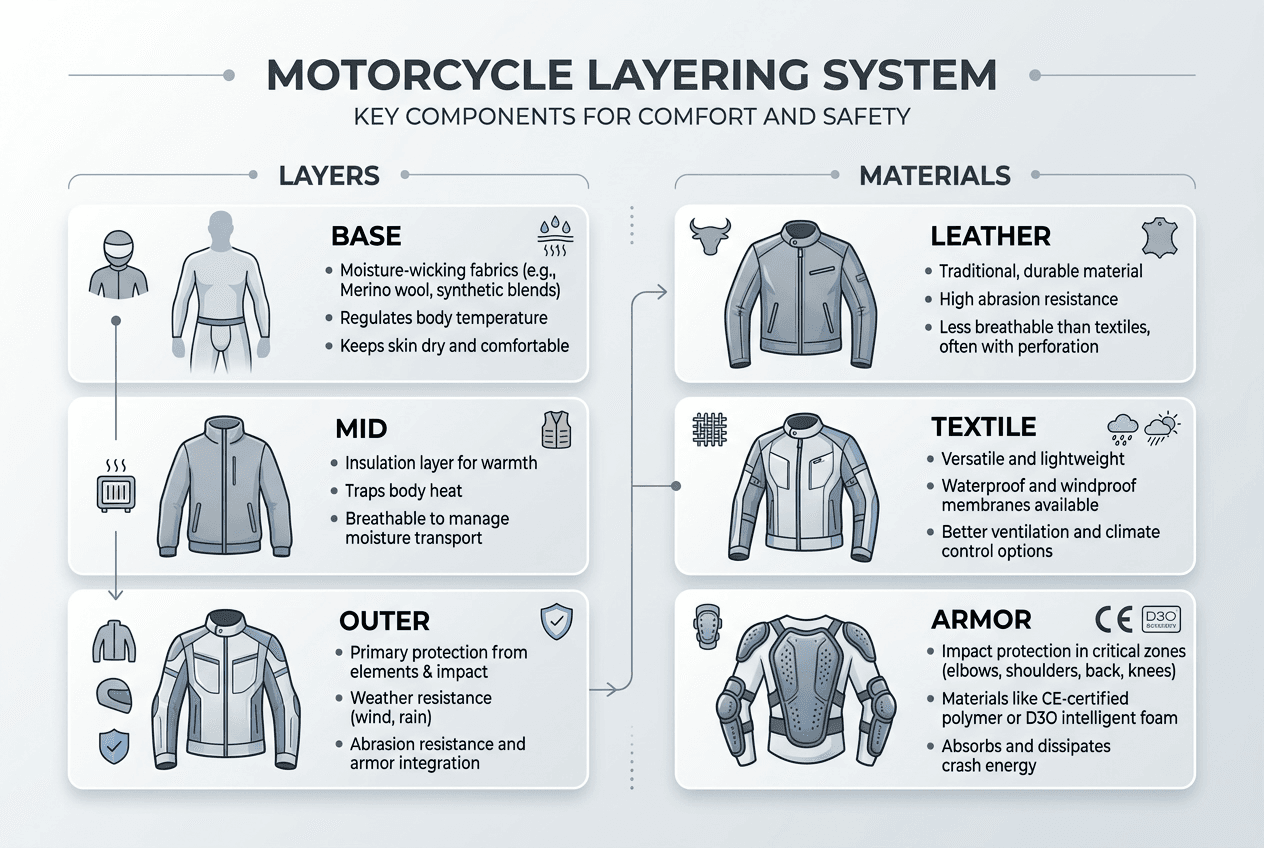
The three-layer system is the foundation of all-year motorcycle comfort. Each layer serves a distinct purpose, and together they create a flexible barrier against temperature extremes and hazards.
1. Base Layer: Moisture Management
The base layer sits against your skin and manages moisture. Synthetic fabrics or merino wool wick sweat away from your body, preventing the clammy feeling that leads to chills when you stop moving. This layer should fit snugly without restricting movement, creating a dry microclimate that stabilizes your core temperature.
2. Mid Layer: Insulation and Temperature Control
The mid layer provides insulation by trapping warm air close to your body. Fleece, down, or synthetic fill materials work well here. Thickness varies by season: a lightweight fleece suffices for spring mornings, while a puffy insulated vest keeps you warm on winter commutes. This layer is your primary temperature control, easy to add or remove as conditions shift.
3. Outer Layer: Protection and Weather Shield
The outer layer shields you from wind, rain, abrasion, and impact. A quality warm motorcycle jacket combines weather resistance with protective armor in shoulders, elbows, and back. Look for reinforced stitching, CE-rated padding, and adjustable cuffs that seal out drafts. This shell is your first line of defense in a crash and your last barrier against the elements.
Adaptability: The Core Advantage
Adaptability is the system’s greatest strength. On a cool morning ride that warms into afternoon sun, you can shed the mid layer at a rest stop and continue comfortably. For unpredictable spring weather, pack a compressible insulated layer in your saddlebag. The modular approach beats a single heavy jacket that leaves you sweating or shivering with no middle ground.
Key qualities for each layer:
- Base layer: moisture-wicking, quick-drying, odor-resistant, snug fit
- Mid layer: breathable insulation, packable, easy on/off, temperature-appropriate thickness
- Outer layer: abrasion-resistant, impact-rated armor, waterproof or water-resistant, windproof, adjustable ventilation
Mastering this system transforms your riding experience. You gain the confidence to tackle longer trips knowing you can adapt to whatever weather rolls in.
Choosing high-performance materials for safety and durability
Protective materials are non-negotiable for motorcycle apparel. The right fabrics and armor reduce injury severity in crashes while standing up to years of use.
Abrasion Resistance: Your First Line of Defense
Abrasion resistance determines how well your gear holds up when sliding across pavement. Testing reveals significant performance differences. In standardized abrasion tests, Material A achieved 4.59 seconds in critical zones, earning a 6/10 rating. Burst strength matters equally: the same jacket scored 993 kPa for 9/10, indicating exceptional tear resistance.
Leather remains the gold standard for abrasion protection. Full-grain cowhide offers durability at reasonable cost, while kangaroo leather provides superior strength at lighter weight. Textile alternatives like Cordura or Kevlar blend protection with flexibility and weather resistance. For maximum safety, choose motorcycle leather jacket materials rated for high-impact zones.
Table
| Material Type | Abrasion Rating | Burst Strength | Weight | Weather Resistance |
|---|---|---|---|---|
| Full-grain cowhide | High | Very High | Heavy | Moderate |
| Kangaroo leather | Very High | High | Light | Moderate |
| Cordura textile | High | Moderate | Moderate | High |
| Kevlar blend | Very High | High | Light | High |
Impact Protection: Armor Matters
Impact protection relies on CE-rated armor in critical zones. Test data shows elbow protectors averaged 19.4 kN force transmission, while shoulder protectors reached 21.3 kN. Lower numbers indicate better shock absorption. Look for CE Level 1 or Level 2 certification, with Level 2 offering superior impact reduction.
Pro Tip: Check that armor pockets allow upgrades. Many jackets ship with basic foam inserts, but you can swap in higher-rated protectors as your budget allows.
Materials must integrate with your layering system. A thick leather outer shell needs room underneath for mid and base layers without binding at joints. Textile jackets often include removable liners, giving you a single garment that adapts across seasons. Prioritize quality motorcycle jackets features like adjustable waists and cuffs that seal gaps between layers, preventing wind from stealing your warmth.
Durability extends beyond crash protection. UV exposure, rain, and road grime degrade materials over time. Treated leather resists water and staining, while high-denier textiles maintain strength through thousands of miles. Reinforced stitching at stress points prevents seam failure when you need protection most.
Practical tips to prevent hypothermia and manage thermal regulation
Cold-weather riding carries hidden risks that proper layering mitigates. Wind chill amplifies heat loss dramatically, and hypothermia cases occur above 40°F during sustained high-speed exposure.
Protect Your Head and Neck
Your head and neck are thermal weak points. Dense blood-vessel networks radiate heat rapidly to regulate core temperature, and cold conditions accelerate loss through exposed skin. A balaclava or insulated neck gaiter seals this gap, trapping warmth inside your jacket collar. Even a thin layer here makes a noticeable difference on chilly mornings.
Layering Strategies for Cold Riding
Layering strategies for cold riding:
- Start with a thermal base layer covering torso and limbs
- Add an insulated mid layer with front zipper for quick venting
- Seal your outer jacket completely, closing all vents and adjusting cuffs snugly
- Cover your neck and lower face with a gaiter or balaclava
- Use heated grips or glove liners if your hands get cold easily
- Pack an extra mid layer for unexpected temperature drops
Monitor Your Body
Monitor your body during rides. Early hypothermia symptoms include intense shivering, numbness in extremities, and difficulty concentrating. If you notice these signs, stop immediately to add layers or warm up indoors. Pushing through cold stress impairs reaction time and decision-making, increasing crash risk.
Pro Tip: Your core temperature dictates comfort more than your limbs. Keep your torso warm with proper layering, and your body will maintain circulation to hands and feet more effectively.
Prepare for Variable Conditions
Variable conditions demand vigilance. A sunny morning can turn cloudy and windy by afternoon, dropping the effective temperature significantly. Check forecasts before long rides and prepare for the coldest scenario you might encounter. A lightweight packable mid layer takes minimal space but provides crucial insurance.
Step-by-step layering method for common riding weather scenarios
Applying the three-layer system to real conditions builds confidence and comfort. The system adapts from spring mornings to summer heat and rainy fall commutes with simple adjustments.
Spring riding (45-65°F):
- Wear a lightweight synthetic base layer to manage morning chill and afternoon warmth.
- Add a thin fleece or soft-shell mid layer that you can remove and stow easily.
- Use a textile outer jacket with adjustable vents; open them as temperatures rise.
- Keep a neck gaiter handy for early starts, removing it when the sun climbs.
Summer riding (70-95°F):
- Choose a moisture-wicking base layer in light colors to reflect heat.
- Skip the mid layer entirely or use a mesh vest for minimal coverage.
- Select a perforated or mesh outer jacket that flows air while maintaining abrasion protection.
- Open all vents and consider a hydration pack to prevent dehydration.
Fall riding (40-60°F):
- Start with a mid-weight base layer as temperatures drop consistently.
- Add an insulated vest or light jacket as your mid layer.
- Close outer jacket vents partially, adjusting based on exertion and wind.
- Prepare for rain with a waterproof outer shell or packable rain layer.
Winter riding (20-45°F):
- Use a thermal base layer with high insulation rating.
- Layer a thick fleece or down jacket underneath your outer shell.
- Seal your outer jacket completely, using a windproof and waterproof shell.
- Add heated gear if temperatures drop below freezing for extended periods.
Spring Riding (45–65°F)
| Condition | Base Layer | Mid Layer | Outer Layer | Accessories |
|---|---|---|---|---|
| Rainy/wet | Synthetic wicking | Water-resistant fleece | Waterproof shell | Gaiter, waterproof gloves |
| Windy/gusty | Thermal synthetic | Windproof soft-shell | Wind-resistant jacket | Balaclava, sealed cuffs |
| Hot/sunny | Lightweight mesh | None or mesh vest | Perforated textile | Hydration, sun protection |
| Cold/freezing | Heavy thermal | Insulated puffy | Sealed leather or textile | Heated grips, neck gaiter |
Pro Tip: Test your layering setup on a short ride before committing to a long trip. Adjust at home where you have full access to your gear, not at a gas station 100 miles from anywhere.
Personal experimentation is essential. Your metabolism, riding intensity, and bike ergonomics all influence thermal comfort. A sport bike with an aggressive lean puts you in the wind stream differently than an upright cruiser. Adjust your layers to match your specific riding style and conditions.
Explore comprehensive motorcycle gear essentials 2025 to round out your layering system with gloves, boots, and pants that integrate seamlessly with your jacket setup.
Explore custom motorcycle jackets designed for layering and protection
Now that you understand layering principles and material requirements, consider how a custom jacket optimizes both. Off-the-rack gear often compromises fit or features, leaving gaps in protection or comfort. Custom motorcycle jackets address your specific body proportions and riding needs, ensuring every layer works together without binding or bunching.

Customization allows you to specify armor placement, insulation thickness, and ventilation zones that match your typical riding conditions. Tailored sleeve length prevents gaps at the wrists when you reach for controls, while a personalized torso fit accommodates your preferred mid-layer thickness. Jacket customization benefits extend beyond aesthetics to functional advantages that enhance safety and comfort on every ride.
Maintaining your investment requires proper care. Leather needs conditioning to prevent cracking, while textile shells benefit from periodic reproofing to restore water resistance. Follow a detailed leather care guide to extend the life of your gear and maintain protective properties through years of use.
FAQ
What is the best base layer material for motorcycle riding?
Synthetic fabrics like polyester or merino wool excel as base layers because they wick moisture away from your skin and dry quickly. Merino offers natural odor resistance and temperature regulation, while synthetics cost less and dry faster. Avoid cotton entirely as it absorbs sweat, stays wet, and pulls heat from your body when damp. A quality warm motorcycle jacket guide starts with the right foundation layer.
How can I prevent heat loss around my head and neck while riding?
Wear an insulated neck gaiter or balaclava that seals the gap between your helmet and jacket collar. Blood vessels near the skin surface radiate heat rapidly when exposed to cold air, so covering this area retains warmth efficiently. Even a thin layer makes a significant difference, and you can remove it easily when temperatures rise.
Why is layering important instead of a single heavy jacket?
Layering provides flexibility to regulate temperature as conditions change throughout your ride. The three-layer system lets you add or remove insulation without compromising wind or abrasion protection. A single heavy jacket forces you to choose between overheating or inadequate warmth, while layering adapts to morning chill, afternoon sun, and evening cool-downs on the same trip.
Can I use the same layering system for summer riding?
Yes, but you simplify it by eliminating the mid layer and choosing highly ventilated base and outer layers. A moisture-wicking base layer prevents sweat buildup, while a mesh or perforated outer jacket maintains abrasion protection with maximum airflow. Open all vents and consider a hydration system to manage heat stress during hot-weather rides.
How do I know if my layers are working correctly?
You should feel comfortable without sweating or shivering during steady riding. If you overheat quickly, remove a layer or open vents. If you feel cold despite layering, add insulation or seal gaps at cuffs and collar. Monitor your core temperature and extremities, adjusting layers at rest stops before discomfort becomes a safety issue.


